How to automate with Squarespace and Zapier and get your order info in real time
If you sell products on your Squarespace website, its highly likely you’ll want to use that information in other systems. eg. Mailchimp, Xero, Pipedrive and other CRMs and tools. You may have even had a go at plugging in your own Zapier account to try yourself…
Unfortunately, the web app gods have not looked down on you kindly. When you plug in to Squarespace you’ll find that Form entries are the only data you can get out! But this isn’t much good if you want order data! No doubt in another web app life time or two (approximately 1.35 human years) Squarespace will solve this problem for us, in the mean time this blog post will show you how you can still get that data (as long as you’re using Stripe for payments) and make good use of it to save your time!
The recipe
Connect Zapier to Stripe
Get your Squarespace API key
Create a webhook action that asks Squarespace for your order data
Alright, lets get in the kitchen and cook!
Step one: Connect Zapier to Stripe
This is the easiest part. Setup a trigger for a New Charge. As long as you’ve got the login details for the Stripe account connected to Squarespace, all you need to do is log in to it via the Zap trigger you’re setting up. (Ask us if you want to know how to keep this area secure!)
Once you’ve setup the trigger, click on Find Data to import the last 3 charges in Stripe. Hopefully one of those samples will be a sale from Squarespace but if it isn’t (perhaps you have other transactions going through Stripe too, like Xero invoice payments - this is important and I’ll note below*) load some more samples until you find an order.
Edit: Step 1a (fix for Stripe bug)
There is currently a bug in Stripe that popped up after we published this blog - but never mind, here’s the fix! To get ALL the data that you will need from Stripe, you need to add in a Stripe search action after your stripe trigger. Follow the pictures below.
Step two: Create a webhook action that asks Squarespace for your order data
Add a webhook GET request step to your Zap. It should look like this…
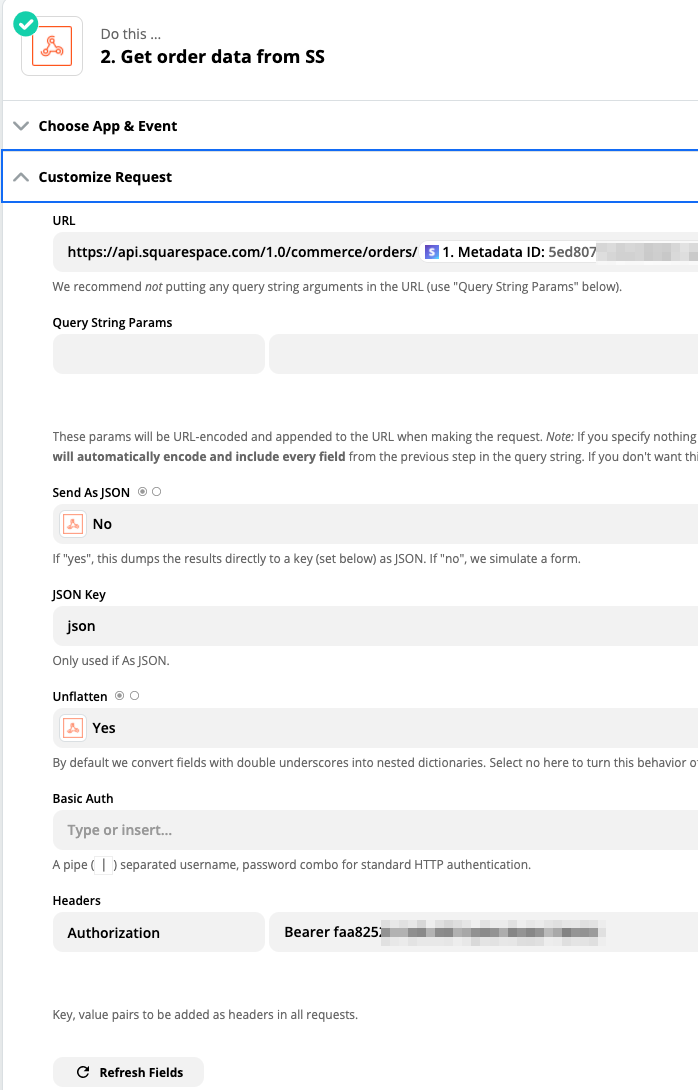
Click on Customize Request and lets get in to it!
You’ll need three pieces of information to complete this step.
A partial Squarespace URL
A Metadata ID from Stripe
Your Squarespace API key
First enter in the partial URL: https://api.squarespace.com/1.0/commerce/orders/ (Hopefully that URL stays the same for the life of this blog, if it doesn’t work, try checking out Squarespace’s Commerce API docs to see if anything has changed. No doubt it won’t be on version 1.0 forever!).
Next up, you’ll need to find the Metadata ID from the Stripe sample you loaded in the trigger. When Squarespace first took your customer’s order, they passed the order information over to Stripe. Part of that information is the exact location of that particular order. AKA. its Metadata ID. You’ll insert this at the end of the URL to make one long URL similar to the image below. Don’t get side tracked by all the other ID fields, there’s quite a few and they won’t work!
Finally, we need to tell Squarespace our secret code word so they let us in. You could say this is actually the second step of this receipe, but if you generated the key earlier, you would’ve copied it to your clipboard and then wiped it when you copied the URL above! So, head off to step three, and come back here when you’ve done it.
Righto, you got that key…? Go to the headers section and type in “Authorization” on the left (sorry, its not going to accept the way the rest of us spell that word!), on the right type “Bearer” then a space and paste in your key.
And thats it! If you’ve entered everything correctly, when you test this step, it should have all the order data related to the customer in your Stripe transaction i ncluding things like Product name, Quantity, Shipping Address etc. Now you can figure out what you want to do with that info like creating a new record in your CRM or adding their contact details to your email app.
Step three: Get your Squarespace API key
Login to your Squarespace account and go to Settings / Advanced / Developer API Keys. Click Generate Key, give it a memorable Key Name and tick the Orders and Transactions boxes. You may need to upgrade your subscription to use this function. Copy the key that it gives you.
*Note to Step one. If you have any other transactions going through Stripe, that aren’t related to the order data you’re after, make sure you setup a filter after the trigger. The filter needs to exclude all those other transactions otherwise they’ll break the zap each time! There usually are a few different fields we can filter on to get the right result, in this case, its probably best to only continue the zap if the Metadata ID exists.
Next steps
Did it work…?! If you get stuck, get in touch and we’ll give you some pointers in a free 30 min call, or we can provide some more extensive coaching for you if you don’t have time to fully explore the Zapier rabbit hole!!


